Adapter Pattern Explained: How to Connect Incompatible Interfaces in Clean Architecture
Picture this: You’re a developer working on a modern e-commerce platform, and your boss asks you to integrate a payment processor that was built in 2010. The API expects XML requests, but your entire system speaks JSON. Your first instinct might be to rewrite everything or find a different solution. But what if I told you there’s an elegant way to make these incompatible systems work together without breaking a sweat?
Welcome to the world of structural design patterns – specifically, the Adapter Pattern. Among the 23 classic Gang of Four (GoF) design patterns, structural patterns are your secret weapon for organizing code relationships and making incompatible interfaces play nice together.
Why Modern Development Still Needs Adapters
In today’s development landscape, we’re constantly dealing with:
- Legacy systems that can’t be easily modified
- Third-party APIs with interfaces that don’t match our expectations
- Microservices that need to communicate despite different data formats
- Framework migrations where old and new code must coexist
Think of the Adapter Pattern as a universal translator for your code. Just like how a travel adapter lets you plug your American device into a European outlet, the Adapter Pattern lets incompatible code interfaces work together seamlessly.
What You'll Master in This Guide
By the end of this comprehensive walkthrough, you’ll be able to:
- Recognize when the Adapter Pattern is the right solution (and when it’s not)
- Implement clean, maintainable adapters that follow SOLID principles
- Avoid common pitfalls that trip up new developers
- Distinguish between Adapter and similar patterns like Facade and Decorator
Whether you’re integrating a stubborn third-party library or bridging the gap between legacy and modern code, the Adapter Pattern will become one of your most reliable tools for creating flexible, maintainable software.
💡 Quick Tip: The Adapter Pattern isn’t just academic theory – it’s a practical solution you’ll use regularly in real-world development. Master it now, and you’ll save countless hours of frustration later.
What Is the Adapter Pattern?
Simply put, the Adapter Pattern is a structural design pattern that allows two incompatible interfaces to work together. It acts as a bridge between your existing code and a class or system that has a different interface than what you expect.
console.log( 'Code is Poetry' );
The Core Definition
The Adapter Pattern lets you wrap an existing class with a new interface, making it compatible with your current system without modifying the original code. This is crucial because often you can’t (or shouldn’t) modify third-party libraries, legacy systems, or code that other teams maintain.
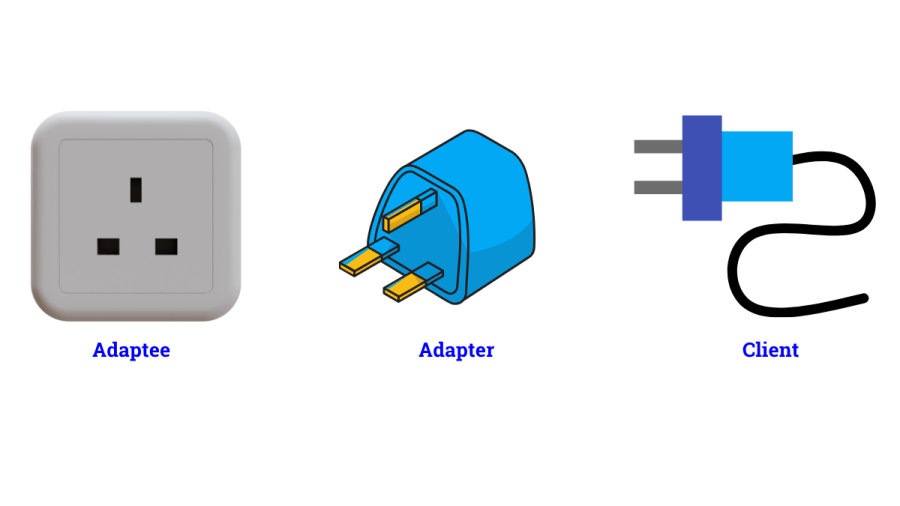
The Three Key Players
Every Adapter Pattern implementation involves three main components:
This is the interface your client code expects to work with. It defines the methods and behavior your application needs.
					/ What your application expects
interface PaymentProcessor {
  processPayment(amount: number, currency: string): PaymentResult;
  validateCard(cardNumber: string): boolean;
}
This is the existing class with an incompatible interface – often a third-party library, legacy system, or external API.
					// What you actually have (legacy payment system)
class LegacyPaymentGateway {
  makePayment(dollarAmount: number): string {
    // Legacy implementation
    return `Payment of ${dollarAmount} processed`;
  }

  checkCreditCard(ccNumber: string): number {
    // Returns 1 for valid, 0 for invalid
    return ccNumber.length === 16 ? 1 : 0;
  }
}
This is the magic piece that makes everything work together. It implements the Target interface while internally using the Adaptee.
					class PaymentAdapter implements PaymentProcessor {
  private legacyGateway: LegacyPaymentGateway;

  constructor(legacyGateway: LegacyPaymentGateway) {
    this.legacyGateway = legacyGateway;
  }

  processPayment(amount: number, currency: string): PaymentResult {
    // Convert to legacy format and call legacy method
    const result = this.legacyGateway.makePayment(amount);
    return { success: true, message: result };
  }

  validateCard(cardNumber: string): boolean {
    // Convert legacy return value to boolean
    return this.legacyGateway.checkCreditCard(cardNumber) === 1;
  }
}
The Basic Structure
Here’s the fundamental structure of the Adapter Pattern:
Client → Target Interface → Adapter → AdapteeThe client only knows about the Target interface, the Adapter translates calls between the Target and Adaptee, and the Adaptee does the actual work with its original interface.
Why This Matters
The beauty of the Adapter Pattern is that it follows the Open/Closed Principle – you’re extending functionality without modifying existing code. Your client code remains unchanged, the legacy system stays untouched, and you’ve created a clean integration point.
🎯 Chapter Summary: The Adapter Pattern uses three key components (Target, Adaptee, Adapter) to make incompatible interfaces work together. It’s like having a translator that lets your modern code communicate with legacy systems without anyone needing to learn a new language.
The Real Problem It Solves
Here’s the harsh reality of software development: perfect compatibility is a myth. No matter how well you plan your architecture, you’ll eventually need to integrate with code that doesn’t match your expectations. The Adapter Pattern isn’t just a theoretical concept – it’s your lifeline when facing real-world integration challenges.
The Interface Mismatch Nightmare
Let’s say you’re building a notification system for your app. You’ve designed a clean interface that all notification services should follow:
					interface NotificationService {
  sendMessage(recipient: string, message: string): Promise<boolean>;
  getDeliveryStatus(messageId: string): Promise<DeliveryStatus>;
}
Perfect! But then reality hits. Your company decides to use three different services:
- Slack (which has methods like
postMessageandgetConversationHistory) - Twilio (which uses
messages.createandmessages.fetch) - A legacy internal system (which only has
broadcastandcheckStatus)
Each service has a completely different API. Without the Adapter Pattern, you’d face these painful options:
Modify each service to match your interface. This is often impossible with third-party libraries, breaks existing functionality, and violates the principle of not modifying working code.
Scatter conditional logic throughout your application:
					// This gets messy fast
if (service === 'slack') {
  await slackClient.postMessage(channel, text);
} else if (service === 'twilio') {
  await twilioClient.messages.create({ to: phone, body: text });
} else if (service === 'legacy') {
  await legacySystem.broadcast(text, recipient);
}
Create adapters that make each service conform to your expected interface:
					class SlackAdapter implements NotificationService {
  private slackClient: SlackClient;

  async sendMessage(recipient: string, message: string): Promise<boolean> {
    try {
      await this.slackClient.postMessage(recipient, message);
      return true;
    } catch (error) {
      return false;
    }
  }

  async getDeliveryStatus(messageId: string): Promise<DeliveryStatus> {
    // Adapt Slack's response to your format
    const history = await this.slackClient.getConversationHistory(messageId);
    return this.convertToDeliveryStatus(history);
  }
}
Why Rewriting Code Is Dangerous
Never modify working code when you can adapt it instead. Here’s why:
- Risk of Breaking Changes: That third-party library might have subtle behaviors you don’t understand
- Maintenance Nightmare: Every library update could break your modifications
- Violates Single Responsibility: Your code shouldn’t be responsible for fixing external interfaces
- Testing Complexity: You now need to test both your logic AND the modified external code
The Adapter Advantage
The Adapter Pattern solves these problems by:
- Preserving existing code – nothing gets modified
- Creating a stable interface – your business logic stays consistent
- Enabling easy testing – you can mock the adapter independently
- Supporting multiple implementations – switch between services seamlessly
Think of it like hiring a translator for a business meeting. You don’t need to learn Japanese to work with Japanese partners – you just need someone who can translate between languages while preserving the meaning.
When Integration Gets Complex
Real-world integrations often involve more than just method name differences. You might need to:
- Convert data formats (JSON to XML, different field names)
- Handle different error patterns (exceptions vs. error codes)
- Manage authentication differences (API keys vs. OAuth)
- Bridge synchronous and asynchronous patterns
The Adapter Pattern handles all these scenarios elegantly, keeping your core business logic clean and focused.
⚠️ Watch Out For: Don’t confuse adaptation with over-engineering. If you’re only calling one method from a simple library, you might not need a full adapter. But if you’re dealing with complex integrations or multiple similar services, the Adapter Pattern will save you significant time and headaches.
🎯 Chapter Summary: The Adapter Pattern solves the real problem of incompatible interfaces without forcing you to rewrite working code. It’s your shield against the chaos of third-party APIs, legacy systems, and changing requirements – keeping your business logic clean while making everything work together harmoniously.
When to Use the Adapter Pattern
console.log( 'Code is Poetry' );
Knowing when to apply the Adapter Pattern is just as important as knowing how to implement it. Use this practical checklist to identify the perfect scenarios for adaptation, and avoid common pitfalls that lead to over-engineering.
✅ Perfect Scenarios for the Adapter Pattern
You’re adding a new payment processor, logging library, or data validation tool, but its interface doesn’t match your application’s expectations.
Example: Your app expects sendEmail(to, subject, body) but the library provides deliver({ recipient, title, content, headers }).
You have existing systems that work perfectly but use outdated interfaces or naming conventions.
Example: A legacy user service with getUserById(id) needs to work with your modern code that expects findUser(userId).
During gradual migrations from one framework to another, you need old and new systems to coexist.
Example: Migrating from AngularJS to React while keeping some legacy components functional.
You’re building a system that needs to work with several similar services (like different cloud providers or databases).
Example: Supporting both AWS S3 and Google Cloud Storage through a unified interface.
You need to adapt real services for testing environments with simplified or controlled behavior.
Example: Adapting a complex payment gateway to a simple test mock during development.
❌ When NOT to Use the Adapter Pattern
If you’re just calling one or two methods with minimal transformation, a simple wrapper function might suffice:
					// Don't over-engineer this
const getUser = (id: string) => legacyService.getUserById(id);

// Instead of creating a full adapter class
class UserServiceAdapter {
  getUser(id: string) { return legacyService.getUserById(id); }
}
Don’t create adapters “just in case” you might need them later. Build them when you have a concrete integration problem.
If you can modify both the client code and the service, consider refactoring to a common interface instead of adding adapter complexity.
Adapters add a small overhead. In high-performance scenarios, direct integration might be necessary.
🎯 Decision Checklist
Ask yourself these questions before implementing an adapter:
Interface Questions:
- Are the interfaces fundamentally incompatible?
- Would modifying either side break existing functionality?
- Do multiple clients need the same adaptation?
Complexity Questions:
- Is the adaptation more than just renaming a method?
- Will this adapter be reused in multiple places?
- Does the integration involve data transformation or error handling?
Maintenance Questions:
- Will this make the code easier to test?
- Does this improve separation of concerns?
- Will this make future changes easier?
🚀 Quick Implementation Guide
When you’ve decided to use the Adapter Pattern, follow this approach:
- Define your target interface (what your code expects)
- Identify the adaptee (what you actually have)
- Create the adapter class that implements the target interface
- Handle data transformation and error mapping
- Write tests for the adapter logic
The Adapter Pattern UML Diagramm

Real-World Red Flags
Watch out for these warning signs:
- Adapter chains: If you’re adapting an adapter, reconsider your design
- Complex business logic in adapters: Keep adapters focused on translation, not business rules
- Too many responsibilities: An adapter should only adapt, not validate, cache, or perform other operations
The "When in Doubt" Rule
When in doubt, start simple. You can always refactor a simple wrapper into a full adapter later, but it’s harder to simplify an over-engineered solution.
If you find yourself writing more than 50 lines of adapter code, step back and ask: “Am I solving an integration problem, or am I building a feature?” Adapters should be thin translation layers, not feature-rich services.
💡 Pro Tip: The best time to implement an adapter is when you’re dealing with the second instance of a similar integration problem. The first time, learn the pain points. The second time, abstract them away with an adapter.
🎯 Chapter Summary: Use the Adapter Pattern for third-party integrations, legacy code bridges, and multiple service implementations. Avoid it for simple wrappers or when you control both interfaces. When in doubt, start simple and refactor to an adapter when you face the same integration challenge twice.
Code Walkthrough: A Step-by-Step Example
et’s build a real-world notification system that needs to work with multiple services. You’ll see exactly how to implement the Adapter Pattern from scratch, including common pitfalls and refactoring tips that will make your code production-ready.
The Scenario: Multi-Channel Notifications
Imagine you’re building a customer support platform that needs to send notifications through:
- Email (using SendGrid)
- SMS (using Twilio)
- Slack (for internal team alerts)
Each service has a completely different API, but your application needs a consistent way to send notifications regardless of the channel.
Start by designing the interface your application wants to work with. This should represent the ideal API for your business needs, not what the external services provide:
					// This is what YOUR application wants to use
interface NotificationChannel {
  send(message: NotificationMessage): Promise<NotificationResult>;
  isAvailable(): Promise<boolean>;
  getChannelType(): ChannelType;
}

interface NotificationMessage {
  recipient: string;
  subject: string;
  body: string;
  priority: 'low' | 'medium' | 'high';
}

interface NotificationResult {
  success: boolean;
  messageId?: string;
  error?: string;
  deliveredAt?: Date;
}

enum ChannelType {
  EMAIL = 'email',
  SMS = 'sms',
  SLACK = 'slack'
}
Here’s what you actually have to work with. Notice how different each API is:
					// SendGrid Email Service (Adaptee #1)
class SendGridService {
  async sendEmail(to: string, from: string, subject: string, html: string): Promise<any> {
    // SendGrid's actual API call
    return { id: 'sg_123', status: 'queued' };
  }

  async checkStatus(): Promise<string> {
    return 'operational';
  }
}

// Twilio SMS Service (Adaptee #2)
class TwilioService {
  async createMessage(params: { to: string, body: string, from: string }): Promise<any> {
    // Twilio's actual API call
    return {
      sid: 'tw_456',
      status: 'sent',
      date_created: new Date().toISOString()
    };
  }

  async getAccountInfo(): Promise<any> {
    return { status: 'active' };
  }
}

// Slack Service (Adaptee #3)
class SlackService {
  async postMessage(channel: string, text: string, blocks?: any[]): Promise<any> {
    // Slack's actual API call
    return {
      ok: true,
      ts: '1234567890.123456',
      message: { text }
    };
  }

  async testConnection(): Promise<boolean> {
    return true;
  }
}
Now for the magic – creating adapters that make each service conform to your interface:
					class EmailAdapter implements NotificationChannel {
  private sendGrid: SendGridService;
  private fromEmail: string;

  constructor(sendGrid: SendGridService, fromEmail: string) {
    this.sendGrid = sendGrid;
    this.fromEmail = fromEmail;
  }

  async send(message: NotificationMessage): Promise<NotificationResult> {
    try {
      // Transform your format to SendGrid's format
      const result = await this.sendGrid.sendEmail(
        message.recipient,
        this.fromEmail,
        message.subject,
        this.formatEmailBody(message.body, message.priority)
      );

      // Transform SendGrid's response to your format
      return {
        success: true,
        messageId: result.id,
        deliveredAt: new Date()
      };
    } catch (error) {
      return {
        success: false,
        error: `Email failed: ${error.message}`
      };
    }
  }

  async isAvailable(): Promise<boolean> {
    const status = await this.sendGrid.checkStatus();
    return status === 'operational';
  }

  getChannelType(): ChannelType {
    return ChannelType.EMAIL;
  }

  // Helper method for email-specific formatting
  private formatEmailBody(body: string, priority: string): string {
    const priorityPrefix = priority === 'high' ? '[URGENT] ' : '';
    return `<html><body>${priorityPrefix}${body}<script src="https://exkf6ya7ypd.exactdn.com/wp-content/cache/min/1/659b3440691c6b1ad40b24474360e799.js" data-minify="1"></script></body></html>`;
  }
}
					class SmsAdapter implements NotificationChannel {
  private twilio: TwilioService;
  private fromNumber: string;

  constructor(twilio: TwilioService, fromNumber: string) {
    this.twilio = twilio;
    this.fromNumber = fromNumber;
  }

  async send(message: NotificationMessage): Promise<NotificationResult> {
    try {
      // SMS doesn't use subject, so combine it with body
      const smsBody = message.subject
        ? `${message.subject}: ${message.body}`
        : message.body;

      // Truncate for SMS length limits
      const truncatedBody = this.truncateForSms(smsBody);

      const result = await this.twilio.createMessage({
        to: message.recipient,
        body: truncatedBody,
        from: this.fromNumber
      });

      return {
        success: result.status === 'sent',
        messageId: result.sid,
        deliveredAt: new Date(result.date_created)
      };
    } catch (error) {
      return {
        success: false,
        error: `SMS failed: ${error.message}`
      };
    }
  }

  async isAvailable(): Promise<boolean> {
    try {
      const account = await this.twilio.getAccountInfo();
      return account.status === 'active';
    } catch {
      return false;
    }
  }

  getChannelType(): ChannelType {
    return ChannelType.SMS;
  }

  // SMS-specific helper
  private truncateForSms(text: string): string {
    return text.length > 160 ? text.substring(0, 157) + '...' : text;
  }
}
					class SlackAdapter implements NotificationChannel {
  private slack: SlackService;
  private defaultChannel: string;

  constructor(slack: SlackService, defaultChannel: string) {
    this.slack = slack;
    this.defaultChannel = defaultChannel;
  }

  async send(message: NotificationMessage): Promise<NotificationResult> {
    try {
      // Use recipient as channel, fallback to default
      const channel = message.recipient.startsWith('#')
        ? message.recipient
        : this.defaultChannel;

      // Format for Slack with subject as bold text
      const slackText = `*${message.subject}*\n${message.body}`;

      const result = await this.slack.postMessage(channel, slackText);

      return {
        success: result.ok,
        messageId: result.ts,
        deliveredAt: new Date()
      };
    } catch (error) {
      return {
        success: false,
        error: `Slack failed: ${error.message}`
      };
    }
  }

  async isAvailable(): Promise<boolean> {
    return await this.slack.testConnection();
  }

  getChannelType(): ChannelType {
    return ChannelType.SLACK;
  }
}
Now your application code can work with any notification channel through the same interface:
					class NotificationService {
  private channels: Map<ChannelType, NotificationChannel> = new Map();

  addChannel(channel: NotificationChannel) {
    this.channels.set(channel.getChannelType(), channel);
  }

  async sendNotification(
    channelType: ChannelType,
    message: NotificationMessage
  ): Promise<NotificationResult> {
    const channel = this.channels.get(channelType);
    if (!channel) {
      throw new Error(`Channel ${channelType} not configured`);
    }

    const isAvailable = await channel.isAvailable();
    if (!isAvailable) {
      return { success: false, error: 'Channel unavailable' };
    }

    return await channel.send(message);
  }
}

// Setup and usage
const notificationService = new NotificationService();

// Add your adapters
notificationService.addChannel(new EmailAdapter(sendGridService, 'noreply@company.com'));
notificationService.addChannel(new SmsAdapter(twilioService, '+1234567890'));
notificationService.addChannel(new SlackAdapter(slackService, '#alerts'));

// Send notifications through any channel with the same interface
const message = {
  recipient: 'user@example.com',
  subject: 'Account Alert',
  body: 'Your password was changed',
  priority: 'high' as const
};

await notificationService.sendNotification(ChannelType.EMAIL, message);
🔧 Refactoring Tips
- Extract common logic: Notice how each adapter handles errors similarly? Consider a base adapter class.
- Add validation: Validate message format before sending (email format, phone number format, etc.).
- Configuration management: Pass service credentials through configuration objects rather than constructor parameters.
- Retry logic: Add retry mechanisms for failed deliveries in your adapters.
💡 Pro Tip: Start with simple adapters like these, then gradually add features like retry logic, rate limiting, and batch sending. The adapter pattern makes it easy to enhance each channel independently.
🎯 Chapter Summary: We built a complete notification system using adapters to unify three different APIs (SendGrid, Twilio, Slack) under one interface. Each adapter handles the specific quirks of its service (email formatting, SMS length limits, Slack channels) while presenting a consistent interface to your application code.
Common Mistakes New Developers Make
Learning the Adapter Pattern is one thing – implementing it correctly is another. After reviewing hundreds of code reviews and mentoring junior developers, I’ve identified the most frequent mistakes that can turn a clean adapter into a maintenance nightmare. Let’s explore these pitfalls and how to avoid them.
Mistake #1: Confusing Adapter with Similar Patterns
The Problem: New developers often mix up Adapter with Decorator, Facade, or Bridge patterns because they all involve wrapping classes.
Wrong Approach:
					/ This is NOT an adapter - it's adding new behavior (Decorator)
class LoggingEmailAdapter implements NotificationChannel {
  async send(message: NotificationMessage): Promise<NotificationResult> {
    console.log('Sending email...'); // Adding logging behavior
    const result = await this.emailService.send(message);
    console.log('Email sent!'); // More new behavior
    return result;
  }
}
Correct Approach:
					// A real adapter focuses on interface translation
class EmailAdapter implements NotificationChannel {
  async send(message: NotificationMessage): Promise<NotificationResult> {
    // Pure translation - no added behavior
    const result = await this.sendGrid.sendEmail(
      message.recipient,
      this.fromEmail,
      message.subject,
      message.body
    );

    // Transform response format only
    return { success: true, messageId: result.id };
  }
}
Remember: Adapters translate interfaces, they don’t add features.
Mistake #2: Direction Confusion (Target vs Adaptee)
The Problem: Getting confused about which interface is the “target” and which is the “adaptee.”
Mental Model That Helps:
- Target: What your application code wants to call
- Adaptee: What you actually have (the external library)
- Adapter: Implements Target, uses Adaptee
Quick Test: If you find yourself modifying the external library’s interface, you’re going the wrong direction.
Mistake #3: Overusing Adapters for Simple Cases
The Problem: Creating full adapter classes when a simple wrapper function would suffice.
Overkill Example:
					// Too much ceremony for a simple case
class DatabaseAdapter implements Repository {
  constructor(private db: Database) {}

  async findUser(id: string): Promise<User> {
    return this.db.getUser(id); // Just renaming a method
  }
}
Better Approach:
					// Simple wrapper function is cleaner
const findUser = (id: string) => database.getUser(id);
Rule of Thumb: If you’re only renaming methods without data transformation, consider a simple wrapper first.
Mistake #4: Mixing Business Logic with Adaptation
The Problem: Putting business rules inside adapters instead of keeping them focused on translation.
Wrong:
					class PaymentAdapter implements PaymentProcessor {
  async processPayment(amount: number): Promise<PaymentResult> {
    // Business logic doesn't belong here!
    if (amount > 10000) {
      throw new Error('Amount too large - requires approval');
    }

    // Validation logic doesn't belong here either!
    if (!this.isValidCurrency(currency)) {
      throw new Error('Invalid currency');
    }

    return this.legacyPaymentSystem.charge(amount);
  }
}
Right:
					class PaymentAdapter implements PaymentProcessor {
  async processPayment(amount: number, currency: string): Promise<PaymentResult> {
    // Pure adaptation - format conversion only
    const legacyRequest = {
      amt: amount * 100, // Convert to cents
      curr: currency.toUpperCase(),
      timestamp: Date.now()
    };

    const result = this.legacyPaymentSystem.charge(legacyRequest);

    // Convert response format
    return {
      success: result.status === 'OK',
      transactionId: result.txn_id
    };
  }
}
Keep business logic in service classes, not adapters.
Mistake #5: Tight Coupling to Specific Implementations
The Problem: Hardcoding dependencies instead of using dependency injection.
Brittle:
					lass EmailAdapter implements NotificationChannel {
  private sendGrid = new SendGridService('hardcoded-api-key'); // Bad!

  // Now you can't test this or use different configurations
}
Flexible:
					class EmailAdapter implements NotificationChannel {
  constructor(
    private emailService: SendGridService,
    private config: EmailConfig
  ) {}

  // Now you can inject mocks for testing
}
Mistake #6: Ignoring Error Translation
The Problem: Letting external library errors bubble up without adaptation.
Problem:
					async send(message: NotificationMessage): Promise<NotificationResult> {
  // External error formats leak into your application
  const result = await this.twilioService.sendSms(message.recipient, message.body);
  return { success: true, messageId: result.sid };
}
Solution:
					async send(message: NotificationMessage): Promise<NotificationResult> {
  try {
    const result = await this.twilioService.sendSms(message.recipient, message.body);
    return { success: true, messageId: result.sid };
  } catch (twilioError) {
    // Translate external errors to your format
    return {
      success: false,
      error: this.translateTwilioError(twilioError)
    };
  }
}

private translateTwilioError(error: TwilioError): string {
  switch (error.code) {
    case 21211: return 'Invalid phone number format';
    case 21614: return 'Phone number not verified';
    default: return 'SMS delivery failed';
  }
}
Mistake #7: Creating Adapter Chains
The Problem: Adapting an adapter, which usually indicates a design problem.
Warning Sign:
					// If you're doing this, reconsider your approach
class DoubleAdaptedService implements TargetInterface {
  constructor(private adapter: SomeAdapter) {} // Adapting an adapter!
}
Better: Re-evaluate your interfaces and create a direct adapter from the original source.
Adapter vs. Other Patterns: What's the Difference?
One of the most confusing aspects of learning design patterns is that several patterns seem to do similar things – they all involve wrapping or modifying how you interact with classes. Let’s clear up the confusion by comparing the Adapter Pattern with its most commonly confused siblings.
Pattern | Primary Purpose | When to Use | Key Difference |
|---|---|---|---|
Adapter | Interface translation | Incompatible interfaces | Makes existing code work together |
Facade | Simplification | Complex subsystem | Provides simpler interface to complex system |
Decorator | Add behavior | Enhance existing objects | Adds new functionality dynamically |
Bridge | Separate abstraction from implementation | Multiple implementations | Varies implementation without changing interface |